Generic Systems Australia
AS2, AS3 and AS4 Transfers
Interested in AS2, AS3 or AS4 transfers? Give GoAnywhere MFT’s trial a go – risk-free!
How to Configure the AS2 Service to Receive AS2 Transfers
In this tutorial, you will learn how to set up and configure your AS2 service in GoAnywhere MFT. AS2, or Applicability Statement 2, is a method used to securely send and receive files over the internet. AS2 messages can be compressed, signed, encrypted and then sent over an SSL tunnel, making AS2 a very secure option for transferring files. AS2 also implements MDN receipts to ensure the delivery of the message.
Enabling the AS2 Service
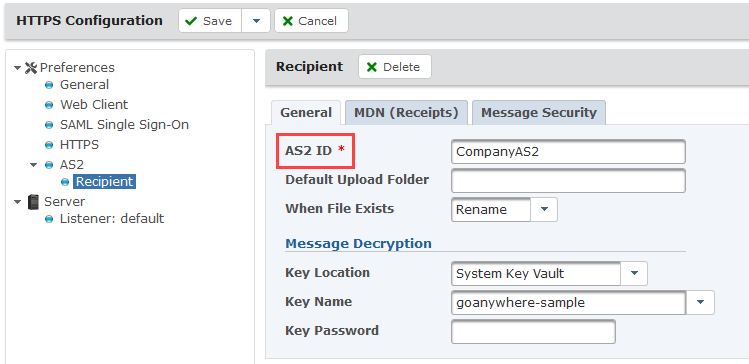
Log in as an Admin User with the Product Administrator role. Click on Services and then Service Manager. On the Service list, click on the HTTPS/AS2 Action icon and select the Edit option. In the left-hand navigation pane, select the AS2 link under the Preferences section.
The AS2 service can be enabled or disabled for use within GoAnywhere. You’ll want to enable AS2 functionality for your authorized Web Users. The AS2 ID is case sensitive. It is the name you want to designate for the GoAnywhere AS2 instance. Take note of the name you choose as you will share this ID with your trading partners.
The Decryption Certificate Alias is an SSL certificate you have created previously. Use the browse option to locate and select the certificate in your private keystore. The Default Upload Folder is the location where AS2 messages are saved when uploaded. The default location is relative to the Web User’s folder and will be created if it does not already exist. Finally, choose what will happen should a duplicate file be uploaded – choose to Rename, Overwrite, Skip the upload, or trigger an Error, stopping the upload from processing any remaining files.

MDN Receipts
If your trading partner requests digitally signed MDN receipts (in order to validate the authenticity of who sent the MDN receipt to them), you will need to open the MDN (Receipts) tab and enter the MDN Signature Certificate Alias, which is the Alias of the certificate you are using to sign receipts.

Message Security
The Message Security tab contains options for defining what message security options will be required - Encryption, Signature, and/or Authentication. Individual Web User settings will override the settings set for the AS2 Service. This is ideal in the event that you require one Web User's message security settings to differ from those defined for the AS2 service. Individual Web User settings are configured on the Edit Web User, AS2 tab.
Upload Restrictions
Message sizes can be resource intensive, and some file types may be harmful to your server. You can limit the Maximum Message Size and set File Extension Filters for the AS2 service under the Upload Restrictions tab.
Save and Finish your changes. The AS2 Service is now configured. You are ready to configure your trading partner’s Web User accounts. If you have already configured the Web User accounts, you are ready to begin sharing information using AS2.
How to Enable SSL for HTTPS/AS2 Server Connections
In this tutorial, you will learn how to create an SSL certificate used to protect the HTTP and AS2 tunnel in GoAnywhere. Learn more about AS2.
Create an SSL Certificate
Before configuring the HTTPS/AS2 service, it is first necessary to create an SSL certificate that will be used to protect the HTTP tunnel.
To create the SSL certificate, log in to GoAnywhere MFT. Click Encryption from the main menu, and then click the Key Management System link. Here you will find a list of Key Vaults. From this page, click on the action icon next to the System Key Vault and select Manage Certificates.

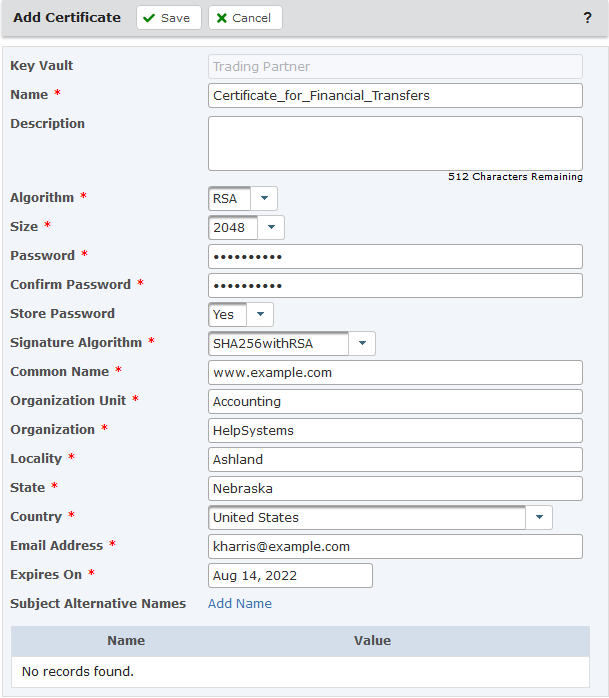
From within the Key Vault, you can import, create, or modify certificates. To create the new SSL certificate, click on Add Certificate. You will then need to complete the SSL Certificate form.

A few field notes:
Key Type – This is the algorithm used to generate the key value for the Certificate.
Key Size – This is the length (in bits) of the key. Values may be 1024, 2048, or 4096 bits. Larger key sizes will provide strong protection but will slow the performance of encryption and decryption processes.
Signature Algorithm – This is the algorithm used for signing the Public key portion of the certificate. SHA256withRSA is recommended in most cases.
Alias – Assign a unique name to the Certificate (for example, “Certificate_for_Financial_Transfers”). It is not recommended to use spaces in the Alias. Instead, an underscore can be used to separate words.
Common Name – Assign a unique name that your trading partner could use to verify your identity. It is recommended that you use your organization’s URL as the Common Name since it is unique to your organization. It is not recommended to use spaces in the Common Name.
When you are finished completing the SSL Certificate form, click Save, which will return you to the Key Vault.
Not using GoAnywhere MFT yet? Start a free trial and test it out for 30 days.